Quick tutorial for beginners how to easily install Oracle Java JDK8 or JDK9 in Ubuntu 16.04 or Linux Mint 18 via PPA.
Webupd8 Team is maintaining a PPA repository with installer scripts for the latest Java 8 and 9, that automatically downloads the Java archive from Oracle website and sets up everything for you.
1. Add the PPA.
Open terminal (Ctrl+Alt+T) and run the command:
sudo add-apt-repository ppa:webupd8team/java
Type in your password when it asks and hit Enter.

2. Update and install the installer script:
Run commands to update system package index and install Java installer script:
sudo apt update; sudo apt install oracle-java8-installer
You may replace oracle-java8-installer with oracle-java9-installer to install Java 9.
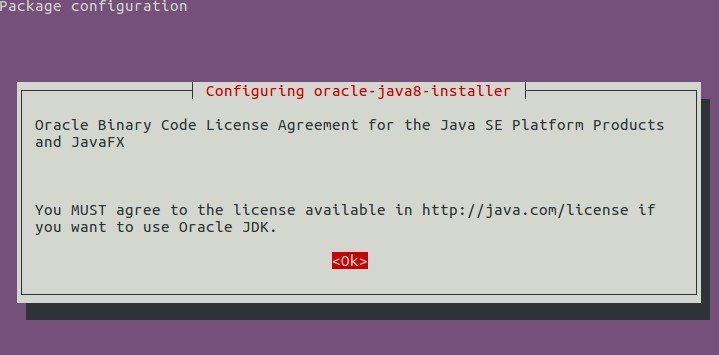
While the install process, you have to accept Java license to continue downloading & installing Java binaries.
3. Check the Java version
To check the Java version after installing the package, run command:
javac -version

4. Set Java environment variables
The PPA also contains a package to automatically set Java environment variables, just run command:
sudo apt install oracle-java8-set-default
For Java 9, install the package oracle-java9-set-default instead.
Well done, it works. Thanks Santa!
How to set the JAVA_HOME variable?
1. Find the java path using this command
$sudo update-alternatives –config java
2. Copy the path from your preferred installation and then open /etc/environment using nano or your favorite text editor
$sudo nano /etc/environment
3. At the end of this file, add the following line, making sure to replace the highlighted path with your own copied path.
JAVA_HOME=”put the java path here”
4. Save and exit the file, and reload it.
$source /etc/environment
5. Test
$echo $JAVA_HOME
any idea on how to uninstall this?
I understand this is an old question but /etc/environment is just a file that is sourced (meaning it’s source code is loaded) each time your system boots, so all you need is to remove the line you used to set the JAVA_HOME variable and on your next reboot JAVA_HOME variable won’t be set (or overwritten, whatever you were doing) by /etc/environment. If it is still set, something else is doing this, not your /etc/environment file (check your $HOME files: .profile, .bashrc, .zshrc… I don’t know how java installation loads on your system, some init file might’ve come with a package).
It worked seamlessly!! Great explaination!!
how do i uninstall this?
https://java.com/en/download/uninstalltool.jsp
Hopefully it works for you! 😀
One of the easiest, quickest… very impressed
too good
thanks man!
Real helpfull
I am getting this problem on the 2nd step.
E: Could not get lock /var/lib/dpkg/lock – open (11: Resource temporarily unavailable)
E: Unable to lock the administration directory (/var/lib/dpkg/), is another process using it?
You’re probably running another command that users apt-get…maybe installing some other software in another terminal or updating your system…
First let that complete and then try the above commands one by one…
thanks! i didn’t know that. 🙂
This will happen during the first minute or so after logging in on Ubuntu if you have enabled automatic updates. A background task is running which in essence is doing “apt update” followed by “apt upgrade”. Until that completes the dpkg lock is engaged. Once that completes you won’t get the error.
thanks for the info!
cool simple solution
Nice! This worked for me, thanks!
Short, sweet, and to the point.
Thanks!
Thank you, it helped me when i struck
short and simple.. thanks